Friday, November 1, 2013

Day 1 of My Christmas Craft Countdown - White on White Christmas Cards

Today is the 1st of November and I have decided to challenge myself to completing all my Christmas Cards, tags and other projects by the 30th of November. The goal is that for once, I will be despatching my Christmas cards well in time, during the first week of December something that I have never done till date! My Countdown Goal is simple - Every day for the next 30 days, I'm going to make 3 projects. They could be cards, tags, gift boxes, ornaments, whatever I want to complete but I have to complete at least 3 projects every day. Think I can do it? Hope you do because already as I type I am  feeling skeptical. 

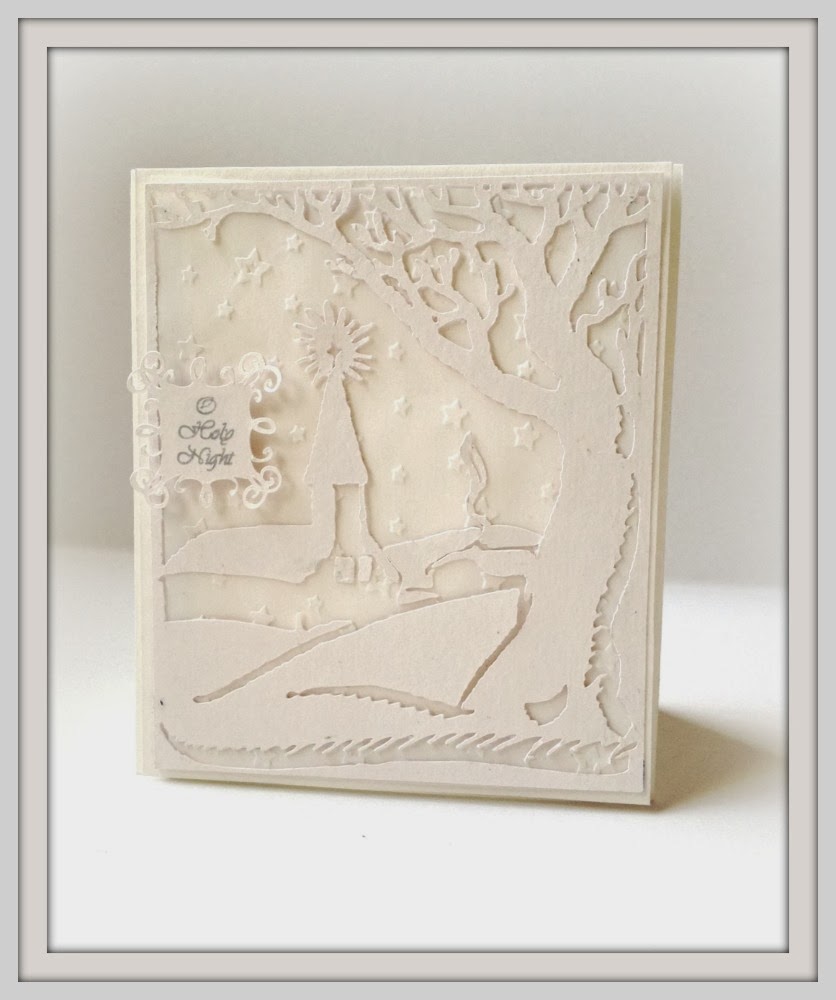
So here are my three cards for today. The theme is 'white on white' for Christmas and I really had a blast putting these together. I didn't want to make them too elaborate but now when you look at them you might think they are. Everything is Cameo Cut and I've tried to add different textures in each card.

Card Number 1 - Snowflakes with Pearls, Natural Fibre Paper and a Doily - My husband says this is looks like a wedding card - I mean Hello does he see the giant snowflakes!!


Card Number 2 - O Holy Night Winter Scene. The structure is supposed to be a church with a steeple but I am thinking the details are not appearing properly in the photo. Also the sentiment is 'O Holy Night' which again is not really visible.


Card Number 3 - Snowman with a Ribbon Scarf. Just on a whim I added pearls for the eyes and I just love that glassy effect!! Ha ha - looks like my snowman has glasses! The sentiment reads 'Happy Holidays!


That's it for today! See you tomorrow! 


If you would like to know the supplies used for this or any of my projects, please write to me at craftingtillthecrackofdawn@gmail.com

UPDATE: 4th November - Made it to the Top 3 for Holly Jolly Christmas Challenge - White on White Cards

Thursday, October 31, 2013

Diwali Cards Night!!!


Woo Hoo, it's almost Diwali weekend and I'm so looking forward to it! Not because I'm going to be lighting diya's or eating yummy food or bursting crackers. Nope! My favourite part about Diwali is Teen Patti or 3 cards or Flash! It's tradition for us in our little group of friends to get together in someone's house for a night of heavy card playing. The stakes are never too high, the food never runs out and the laughter continues to the wee hours of the morning. So when I wanted to make a gift set for our wonderful hosts, the theme was obvious! Diwali Cards Night!!


Here's the card! I've kept it CAS and added a pun the sentiment - Have a 'Flash'y Diwali as the game we play is called Flash. It's also known as Teen Patti or 3 cards and in the US, it's known as Caribbean Stud Poker. But conveniently we call it Flash so 'Have a Flashy Diwali' is a perfect play with words, ideal for Lulupu's Word Play Challenge for which I am entering this card. CASolgy's challenge 68 is also Black, so I'm entering this card for that as well.


On to the gift box. I usually prepare some cupcakes or brownies when we head over for Cards Night. This time I thought I would make a box to present it. I continued the playing cards theme and added some pattern paper, a Cameo Cut Frame, the wonderful card game symbols and a four looped bow! I'm entering this box into The Three Muses Challenge - Black, White and Red

I'm entering the entire set into City Crafter Challenge Blog Week 183 - Game Night. I actually got the entire idea of this project from this Challenge Theme. So glad I came across it! Can't wait to present it!

If you would like to know the supplies used for this or any of my projects, please write to me at craftingtillthecrackofdawn@gmail.com

Monday, October 28, 2013

A Roses And Butterflies Card - Inspired by a Previous Project


Does this look familiar? If you know my work, you'll recognise it immediately! One of my earlier projects on this blog was a Glittering Butterfly Card with a Ginormous bow. The feedback was a shade mixed - some thought it was grand and stylish and loved the bow. Others weren't too kicked about the colours, the bow being so big and the gold was bordering on harsh. So when I was asked to recreate this for someone, it was mildly suggested that I tone it down a bit - replace the gold with red, reduce the size of the butterflies and replace the bow with something less dominating. So here's my creation!


I replaced replaced the bow with a rim of red roses from ItsyBitsy. Love them, can't go wrong with them. I also made the butterflies smaller as you can see. The rest I kept the same. The base layer is white card stock, followed by another layer of card stock and the top layer is vellum embossed with a floral design.


 But here's something new to share! How do you like my coordinating box envelope? The flap has the same butterfly design in the same rich red all cut from my cameo! Isn't it awesome! I've made it before for other butterfly cards but just realised that I have never shared it on my blog. 

So what do you think of my card as compared to the previous one? Is this better or do you prefer the gold one? Would love to hear your thoughts! 

Linking to 
DCAM Challenge 3 - I've chosen the red and white colour scheme.  

If you would like to know the supplies used for this or any of my projects, please write to me at craftingtillthecrackofdawn@gmail.com

Saturday, October 26, 2013

A Jar for Fall


I love love LOVE fall colours. Although here in India, specially Bangalore, we don't really have the 'fall' season nor do we have the colours, I still love the schemes that are popping out of overseas craft challenges. Most challenges have fall related themes and although it doesn't bring up any specific feelings or sentiments for me, I simply ADORE the colour spectrum. The Shabby Tea Room has asked for Fall Florals this time. We're required to create a project inspired by a photograph (at the end of this post) and include some fall flowers in our project. So here is my card.


The flowers are all handmade by me using the Tattered Florals Garland die, heavily distressed with Vintage Photo distress ink. The jar is cut on my cameo as well as the lattice background. These two elements were also distressed with Antique Linen.  Here's the inspiration photo: 


I also included a lot of layers and texture in this project along the lines of the BGC's Layered and Over the Edge. The base layer is white card stock, then a layer of this awesome white Thai paper from ItsyBitsy which is almost furry. Next I added a layer of burlap and finally the lattice layer of card stock. The flowers are spilling over the edge on two corners of the card. 

Also entering Colour Conceptions Challenge 4 - Distress - As I said earlier, the flowers are distressed with Vintage Photo Distress Ink and the Jar/ Lattice with Antique Linen Distress Ink. 

That's it from me! Later folks!


If you would like to know the supplies used for this or any of my projects, please write to me at craftingtillthecrackofdawn@gmail.com

Thursday, October 24, 2013

A Head over Heels Card!

I'm loving the challenges that are going on at present in our little Craft Blogosphere. They are really inspiring me to get crafting. Sindhu's 2nd challenge in her Anniversary Celebrations is an ABC Word Play. Hosted by Tejal, we have to choose a letter in the alphabet and build our card around that. I chose the letter S! S for Stilettos, S for Swirls (on the embossing), S for Spots (on the shoe) and S for Sunehra of course!! Ha ha! We are also required to keep it CAS - Clean and Simple.


I'm not naturally inclined towards CAS unlike Sindhu who seems to have MASTERED IT!! So I actually take double the time with such cards than with a layered, heavily embellished one. I was at it till 1:30am this morning and here is the final project! The shoe is cut with my Cameo and some pretty DCWV pattern paper. I used the Cameo with a pen for the sentiment too. 


Lulupu's current challenge is Word Play with CAS and I love Pooja's guideline - loads of white space, a focal point and a pun in the sentiment. I had some fun thinking of the perfect sentiment for this card but then it became obvious - I'm head over 'heels' into you!

If you would like to know the supplies used for this or any of my projects, please write to me at craftingtillthecrackofdawn@gmail.com

Tuesday, October 15, 2013

A Lacy Parasol Black and White Card


Whew! It's been a long time since I posted a project on this blog. It's not because I've not been crafting till the crack of dawn, because I have. It's not because I don't craft any more, because if you've been following the Itsy Bitsy blog, you know that I have. It's not because I've run out of ideas, because again  all my ideas are showcased on ItsyBitsy. I guess I haven't posted in a while because the responsibilities of being a mother of 2 finally caught up with me. Between shuttling my son to school, dealing with daily homework, trying to manage my extremely naughty toddler daughter and ensuring I spend enough time with them, I finally had to give my craft blog a bag seat.

That was until I saw Corrinne's fabulous inspiration on Sindhu's blog. Sindhu is celebrating her first wedding anniversary and her blogaversary by hosting weekly challenges. Corrinne Dietrich of Dietrich Designs was the first host and her challenge is Wedding/ Anniversary Cards with Black and White and Lace. Corrine's inspiration card is totally to die for and from the moment I saw it, I knew I had to make something for it. Last night after putting the kids to sleep, I suddenly got an idea for it and I jumped up from the covers to craft! Here's what I made. 


My idea was a lace parasol right from a Jane Austen novel. And I wanted it closed so that the frilly trim is dominant. I actually have 2 such parasols - actual versions one with black lace and one with white. I could never use them but they were so so so so pretty that I just had to have them. I followed the tutorial on this link to make the parasol with a few changes of my own. Here's a closer look at the parasol. 


The ornate frame is cut from my cameo and the pattern paper beneath it is from the DCWV Lemon Flower stack. It's sooo gorgeous! Silver textured design, perfect for my card. Was delighted to find it in my stash but very reluctant to actually use it. It was so so so pretty. 

Well that wraps up this post. See you around Blogosphere either here or on the ItsyBitsy Blog. Toodles!

Also linking to Lulupu's Load it Up Challenge (Thanks Doc Sonia). I have 4 layers over the base card and the 3 embellishments are - a lace parasol, ribbon and a pearl.

If you would like to know the supplies used for this or any of my projects, please write to me at craftingtillthecrackofdawn@gmail.com

Tuesday, July 9, 2013

A Shabby Chic Pink Card


I gotta say when I first saw the inspiration photo at the 'For Love of Crafting' Shabby Chic Challenge, I was literally blown away and despite it being a really crazy month for me, I was desperate to create something for the contest.  But as the days passed, it became more and more evident that time was not on my side, and I would probably have to give it a miss. The month of July began, and all hope was lost until I saw a post on my blogger feed. It was a project by Shweta Patil of 'Creative Space'. She had just done a Shabby Chic card for this challenge and that's when I remembered, For the Love of Crafting  starts on the 10th of the month, not the 1st which means they were still open for submissions! Hurray!! I got to work right away and here's my creation. 


So there were a lot of things in the inspiration photo that appealed to me. The soft cream, white and pink colour scheme, the floral motif, the rose bunches and the theme of Shabby Chic is one of my faves at the moment. I tried to incorporate all these elements into my card. Here are some closeups. 


And here's a look at the the inspiration photograph from the challenge. Isn't it just fantastic! Makes you want to just run to the craft table and get crafting!!


If you would like to know the supplies used for this or any of my projects, please write to me at craftingtillthecrackofdawn@gmail.com